
Hey there, fellow IT admins.
If you have ever configured Local user group membership policies in Microsoft Intune, you probably ran into this funny little problem.
You need to add an Entra ID group to a local Windows group, like Administrators, Remote Desktop Users, or some other special local group, but Intune asks for the group SID.
And then the obvious question comes up: where do I find the SID for an Entra group?
You would think this would be easy. Open the group in Entra ID, copy the SID, paste it into Intune, and move on with your life.
Well, not exactly.
Entra ID groups have object IDs, but when you are configuring local group membership on Windows devices, especially through Intune, what you often need is the SID, not the object ID.
This is especially important when you are working with the Local user group membership profile under Intune admin center > Endpoint security > Account protection. Microsoft documents the manual option for this profile as supporting usernames, domain usernames, and group SIDs in its account protection policy documentation.
Why do we need the Entra group SID?
Let us say you want to create a policy that manages the local Administrators group on Windows devices.
Maybe you want to add:
- A local admin account
- One or more Entra ID groups
- A break-glass admin group
- A remote support group
- A group that allows RDP access
This is a very common scenario.
Now, if you are using Add (Update), you may be able to select users and groups directly in the UI. But in many real-world cases, especially when you want tighter control, you may need to use Add (Replace) with Manual user selection.
And this is where things get interesting.
With Add (Replace), Intune replaces the local group membership with exactly what you define in the policy. This is great for security because it removes unexpected local admins or unwanted group members.
But what if you need to add both:
- A local user account that Entra ID knows nothing about
- An Entra ID group
You cannot just search for the local user in Entra ID because it does not exist there. It is a local Windows account.
So you end up needing to manually enter users and groups. For local users, you can use the username. For Entra groups, you need the SID.
And creating two separate policies is usually not the right answer, because they can conflict with each other when both policies try to manage the same local group.
So, we need one policy that can include everything.
Local users. Entra groups. Maybe even multiple groups.
The trick is finding the Entra group SID.
If this policy is part of a broader local administrator design, pair it with How to Create Local Administrator Account Using Microsoft Intune so the local account, LAPS posture, and local group membership model stay aligned.
Getting the SID is one part of controlling administrator access. If you need help deciding who should have access and keeping those policies consistent, Veles can help with role and privilege design. Explore access-control consulting
The easiest way I found to get the Entra group SID
The easiest method I found is to let Intune show it to you.
Yes, really.
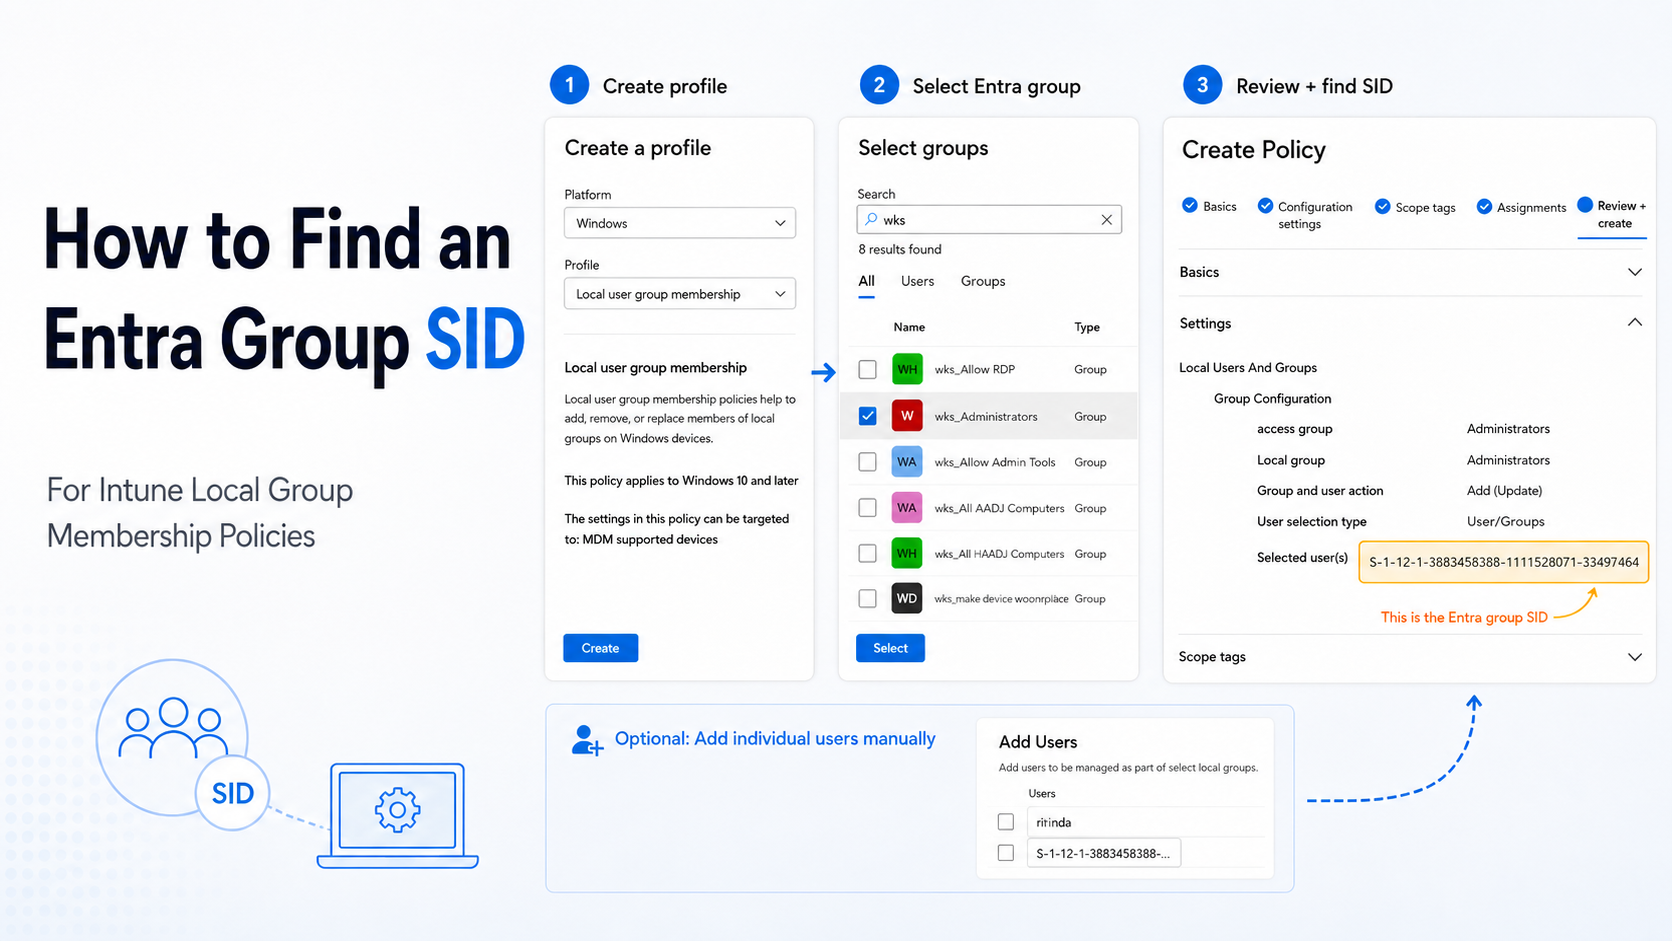
You can create a temporary dummy policy, select the Entra group through the normal picker, and then copy the SID from the review page.
Here is how.
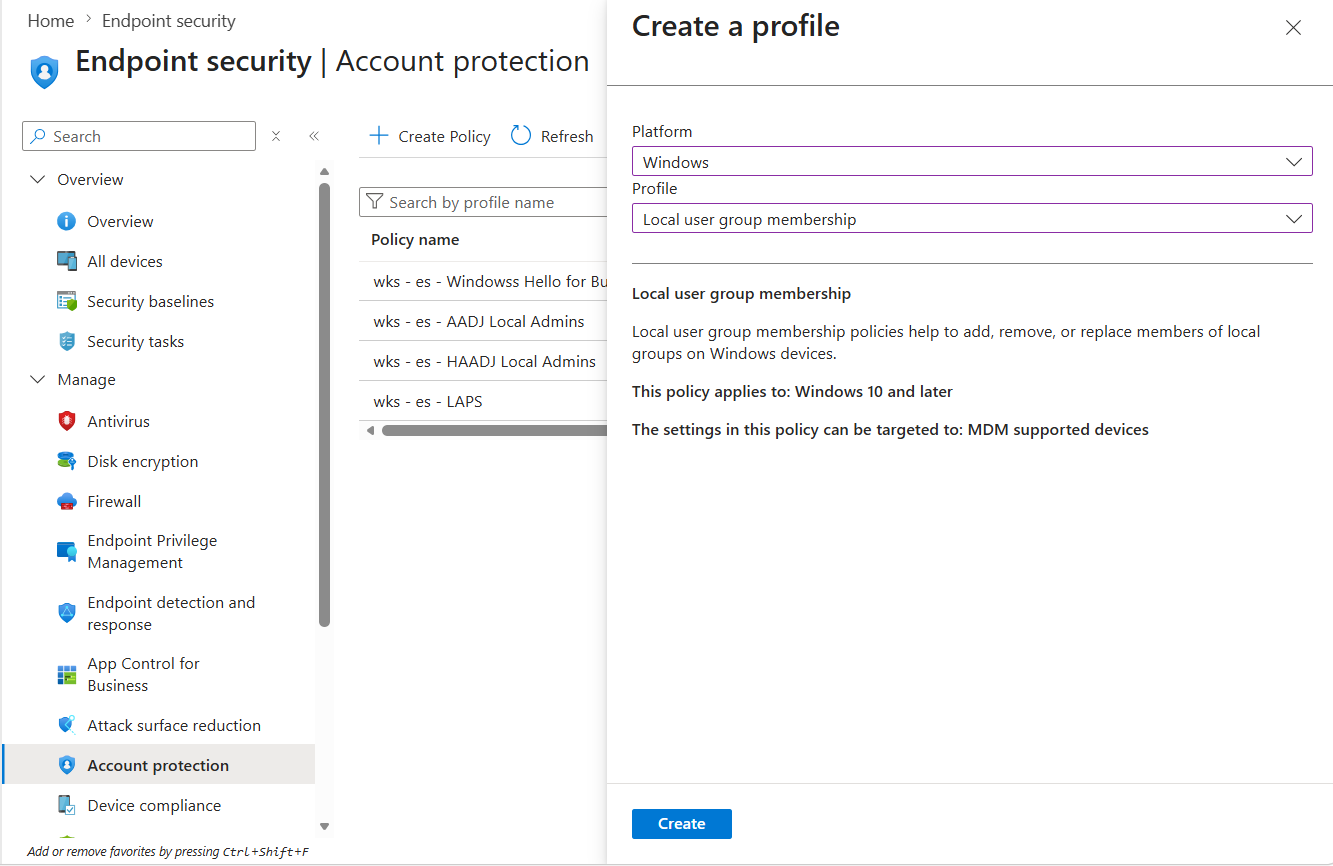
Step 1: Create a dummy Local user group membership policy
In the Intune admin center, go to Endpoint security > Account protection.
Click Create Policy.
For Platform, select Windows.
For Profile, select Local user group membership.
Then click Create.
Step 2: Give the policy a temporary name
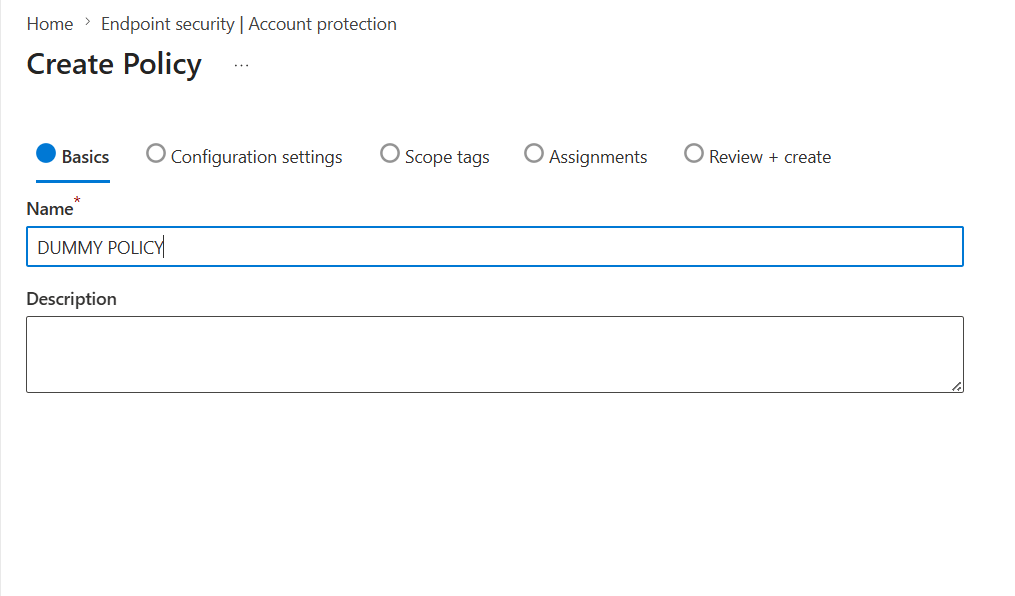
On the Basics page, give it a simple name.
DUMMY POLICY
You do not need anything fancy here. This policy is only being created temporarily so we can get the SID.
Click Next.
Step 3: Configure local group membership
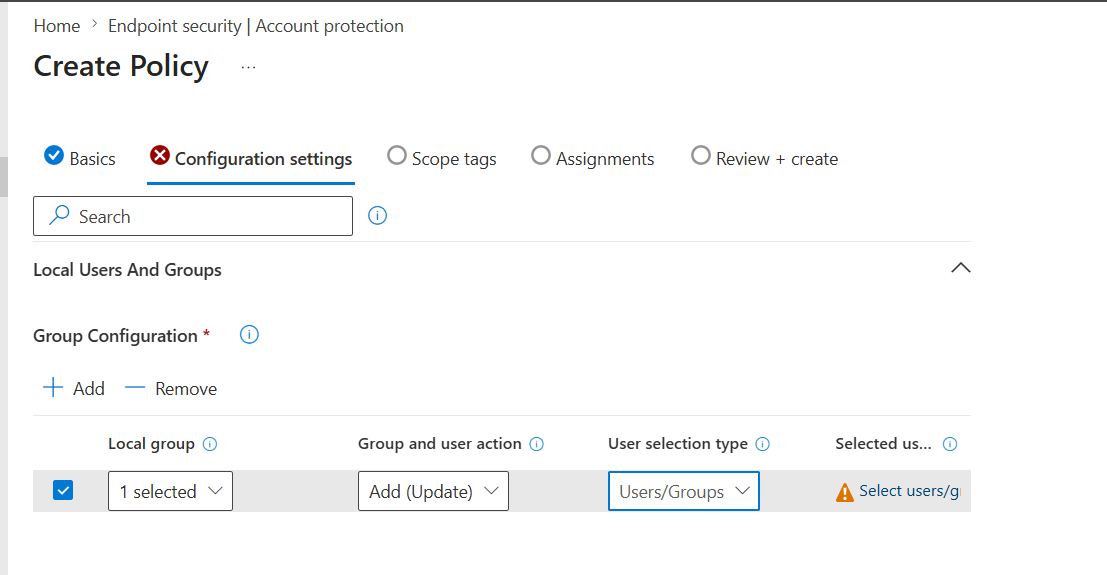
On the configuration page, add a local group membership configuration.
For example, choose:
Local group:AdministratorsGroup and user action:Add (Update)User selection type:Users/Groups
Then click Select users/groups.
This is important. For this temporary policy, we want to use the picker so Intune can resolve the Entra group for us.
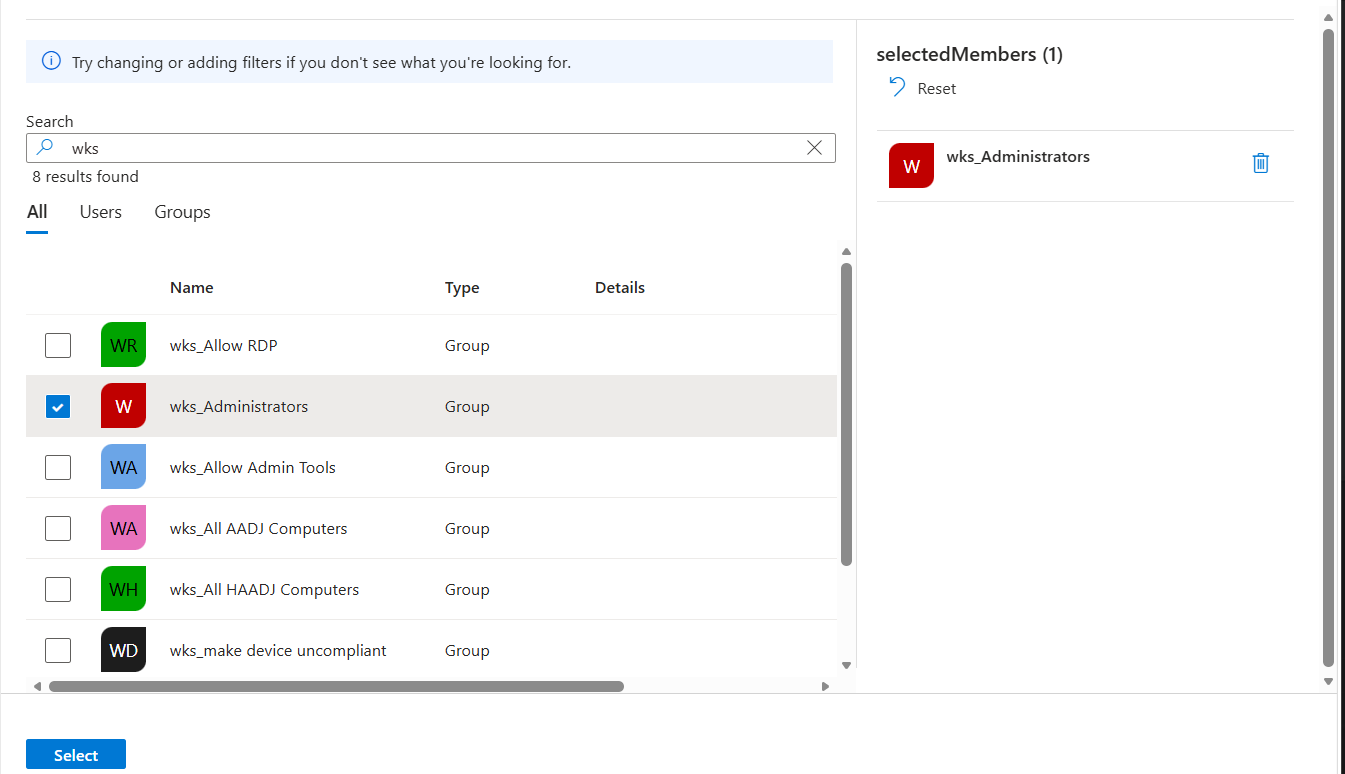
Step 4: Select the Entra group
Search for the group you need.
In my example, I selected:
wks_Administrators
Select the group and click Select.
Step 5: Go to the Review + create page
Now just click through the remaining pages:
Next > Next > Next
You do not need to assign this policy to anything.
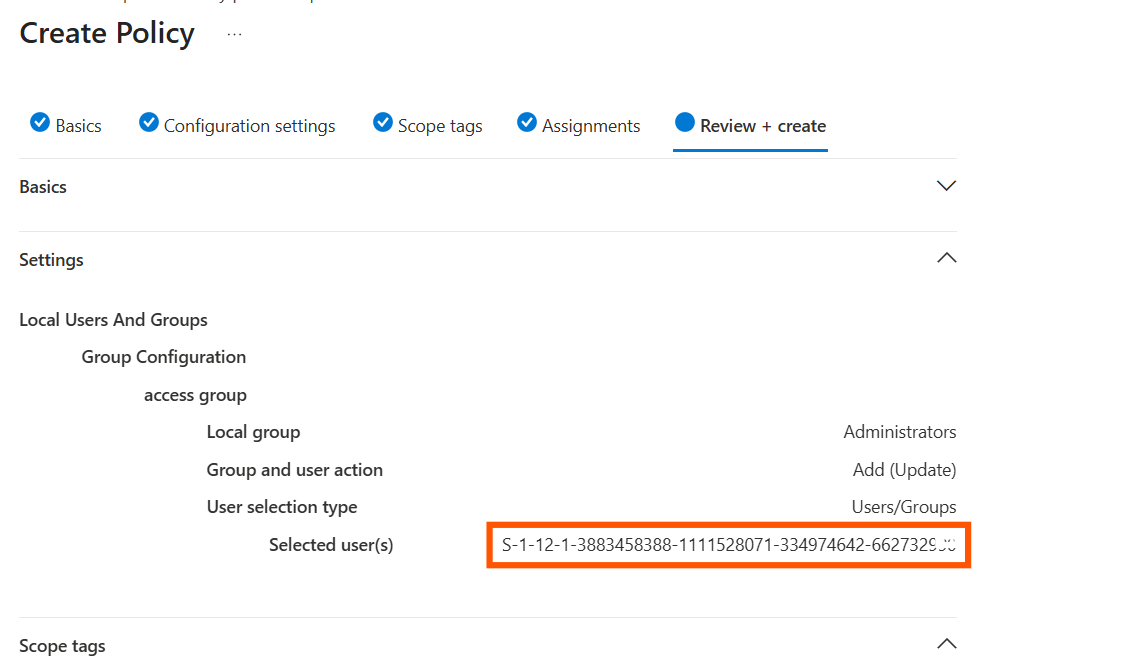
When you get to Review + create, expand the Settings section.
Here is the magic part.
Under Selected user(s), Intune will show the SID for the Entra group.
It will look something like this:
S-1-12-1-3883458388-1111528071-334974624...
Using the SID in your real policy
Now go back to your actual policy.
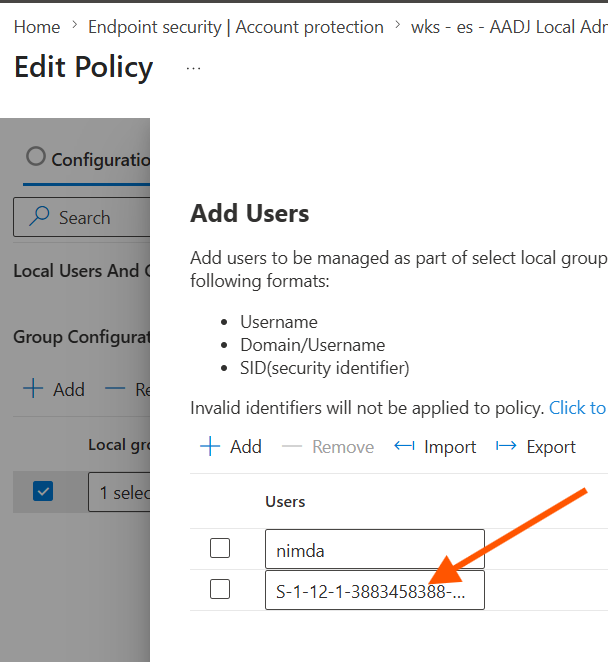
This time, if you are using Manual user selection, you can add entries like this:
LocalAdmin
S-1-12-1-3883458388-1111528071-334974624...
AnotherLocalUser
S-1-12-1-xxxxxxxxxx-xxxxxxxxxx-xxxxxxxxxx...
This gives you much better control because you can mix and match:
- Local users
- Entra ID groups
- Multiple admin groups
- Remote support groups
- RDP access groups
- Custom local group members
This is especially useful when building a clean local administrator strategy where you want to use Add (Replace) and explicitly control who is allowed to remain in the local Administrators group.
For remote support scenarios, this also connects nicely with How to Remotely Manage Entra Joined Windows Computers and Essential Firewall Configuration for Secure Remote Management on Azure AD Joined Devices. Group membership is only one part of the access path; firewall and remote management posture still matter.
Why not just use the Entra object ID?
This is where many admins get stuck.
The Entra portal shows you the Object ID of the group, but the Intune local group membership policy needs the group in a format Windows can understand locally.
For Entra ID security principals on Windows, that means SID format.
So if you paste the Entra object ID into the local group membership policy, do not expect it to behave the same way.
For this specific Intune scenario, make sure you are using the SID, not the object ID.
The underlying Windows policy CSP also describes that local users and groups membership entries can use a Microsoft Entra SID or user name. You can see that behavior in the LocalUsersAndGroups Policy CSP documentation.
Real-world use case
Here is a common example.
You want the local Administrators group to include only:
- Your managed local admin account
- Your workstation admins Entra group
- Maybe your emergency access group
And you want everything else removed.
That means Add (Replace) is usually the right approach.
But because your local admin account is a local Windows account, Entra ID does not know about it. You need to manually enter that account.
And because your admin group is an Entra group, you need to manually enter the SID.
This is exactly where this method helps.
You create a dummy policy, select the Entra group, get the SID from the review page, and then use that SID in your real policy.
Simple, practical, and no PowerShell required.
Final thoughts
This is one of those Intune things that works well once you know the trick, but it is definitely not obvious the first time you run into it.
Finding the Entra group SID should probably be easier, especially when Intune already knows how to resolve the group behind the scenes.
But until Microsoft makes this more intuitive, the dummy policy method is the easiest and cleanest approach I have found.
Create a temporary policy, select the group, go to the review page, copy the SID, and then use it in your real local group membership policy.
That is it.
Now you can build proper local group membership policies that include both local users and Entra groups without creating conflicting policies or guessing which identifier Intune expects.
See related Veles work: Gibson Energy endpoint modernization case study